Integrations
General Integrations#
Getting Started with Email Reports#
-
Start by clicking on the Magic Wand icon
 located in the top-right corner of the user interface.
 -
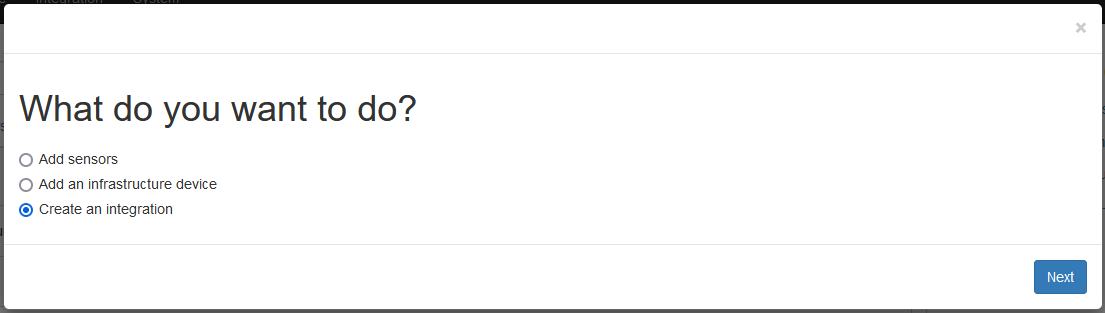
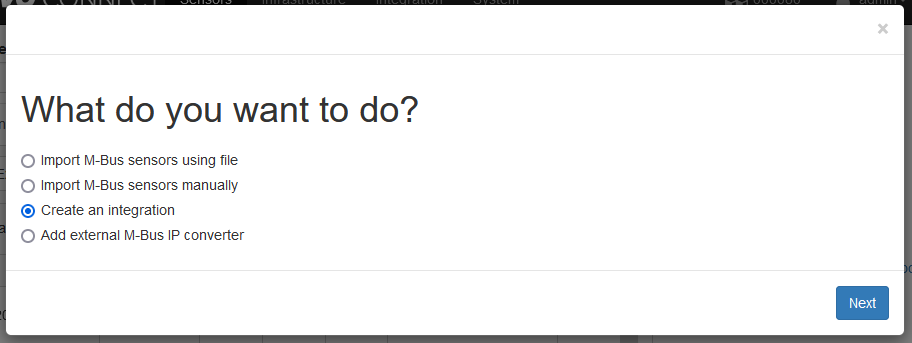
Select Create an integration and click "Next."
-
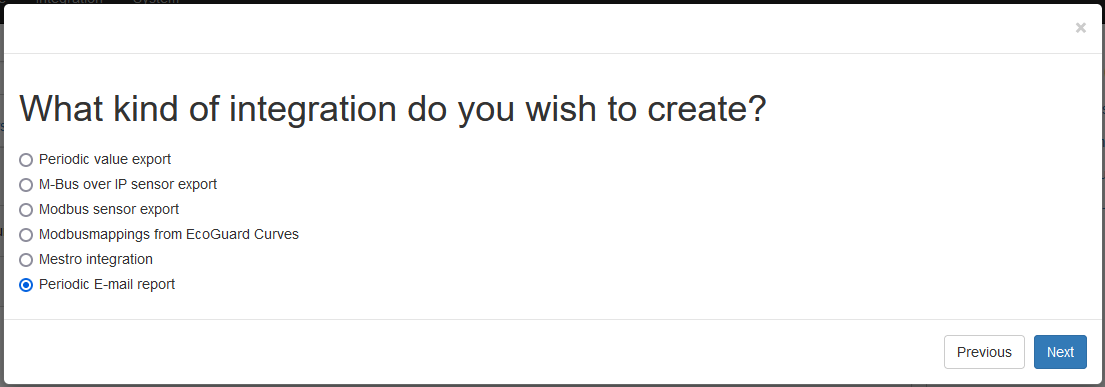
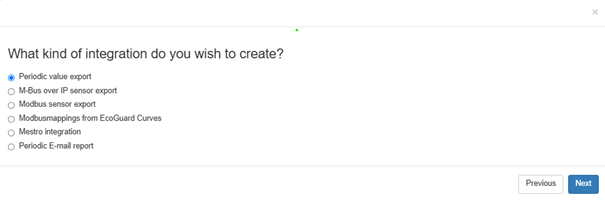
In the next view, you will need to choose from six options. Select Periodic Email Report and click "Next."
-
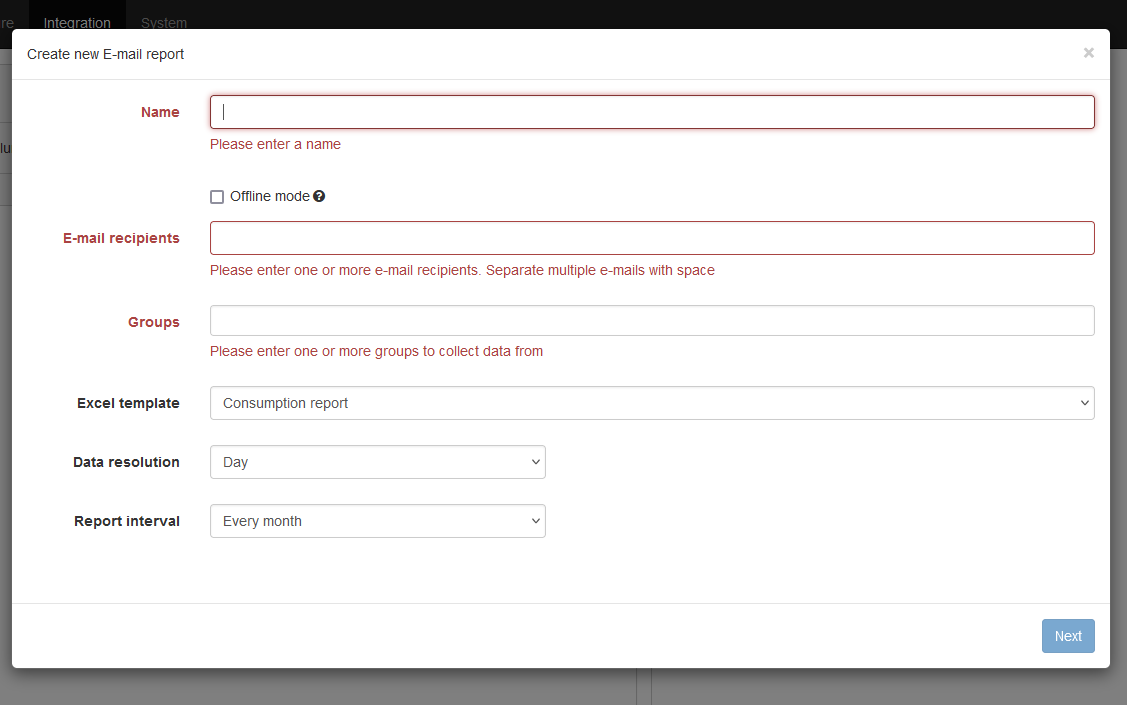
You’ll now be presented with fields to complete for your email report setup:
- Report Name: Enter a name for your email report (e.g., "Monthly Consumption Report").
- Recipient Email: Provide the email address where you wish to receive the report.
-
To enable the data export, select the group whose sensor data (e.g., temperature sensors) you want to report on:
- Group Name: Specify the name of the group.
-
Choose from three available templates for email reports:
- Consumption Report: General consumption data.
- Consumption Report for Billing: Detailed data for billing purposes.
- Value Report: Snapshot of sensor values.
-
Define the report’s timing and frequency:
- Data Resolution: Set the interval at which data will be captured.
- Report Interval: Specify the duration over which data should be gathered for each report.
-
In the next step, select the types of values you wish to export.
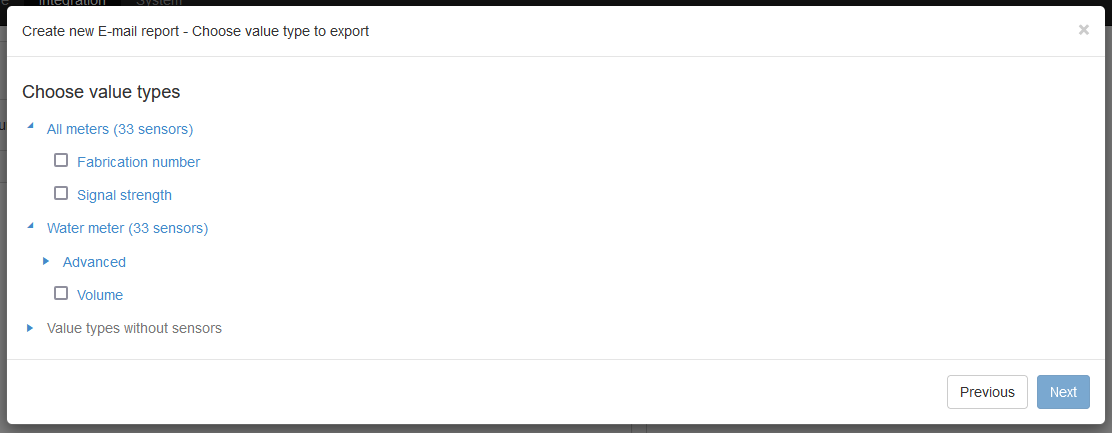
- Finally, choose the unit format you want the data to be displayed in.
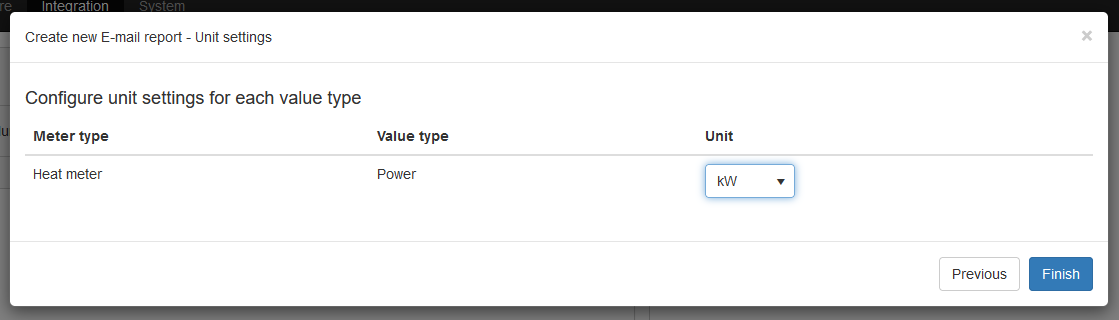
Once you’ve completed these steps, your first email report will be sent according to the interval you specified.
How to Export Sensors via Modbus#
- Click the wand icon in the upper right corner of the screen to start the guide.
-
Select "Create an integration" and click Next.
-
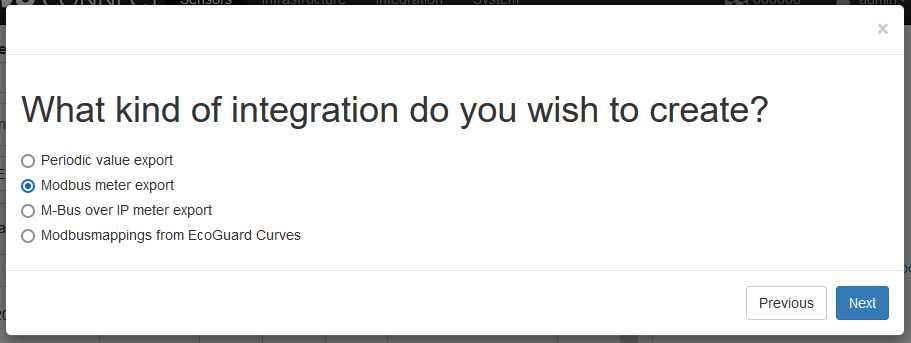
Select "Modbus meter export" and click Next.
-
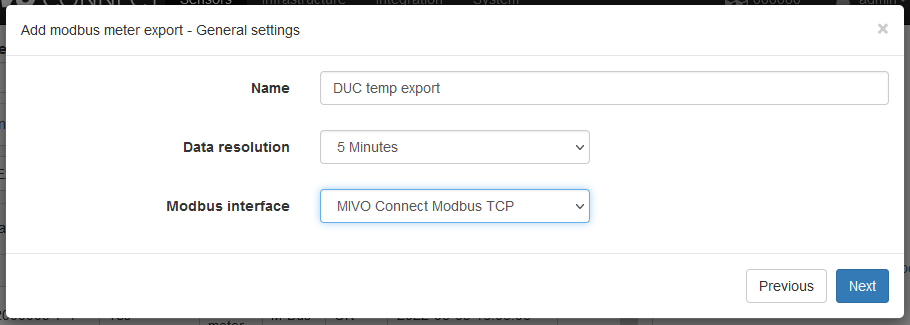
Give the integration a name, set the update interval, and specify which interface the data should be available on. Click Next.
-
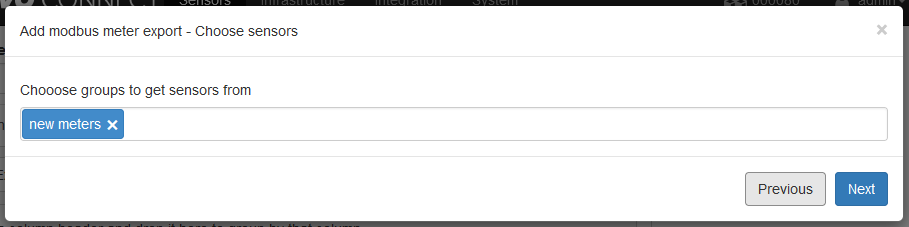
Select the groups to be exported and click Next.
-
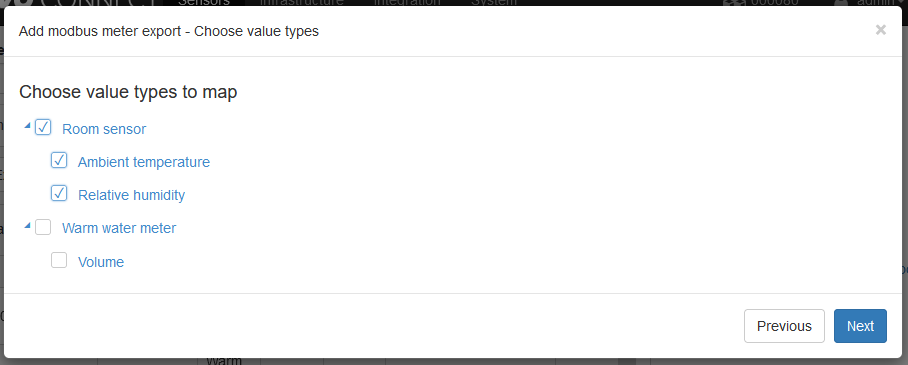
Choose which values you want to export from these sensors and click Next.
-
For each value type you want to export, certain settings are required:
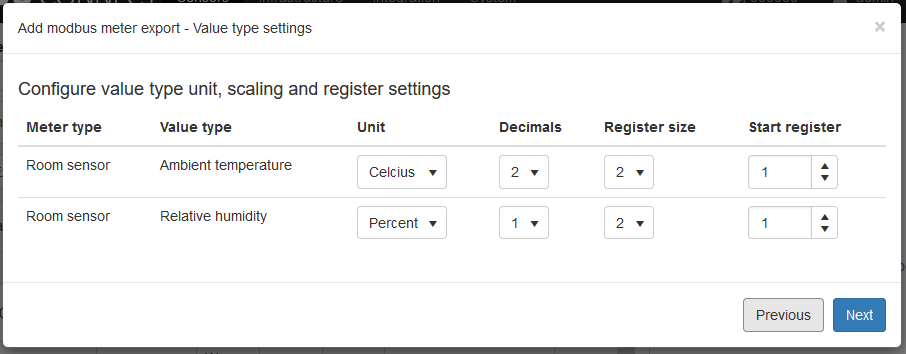
- Unit: The expected unit of the exported value.
- Decimals: If you expect the exported value to contain decimals (e.g.,
24.12°Cexported with 2 decimals fills the register with2412). - Register size: Expected register size in number of registers (16-bit).
1= INT162= INT324= INT64- Start register: The starting position for automatic mapping.
- Different start registers can be used to group different value types in different areas.
- Using the same start register for multiple value types groups meters by sensor.
-
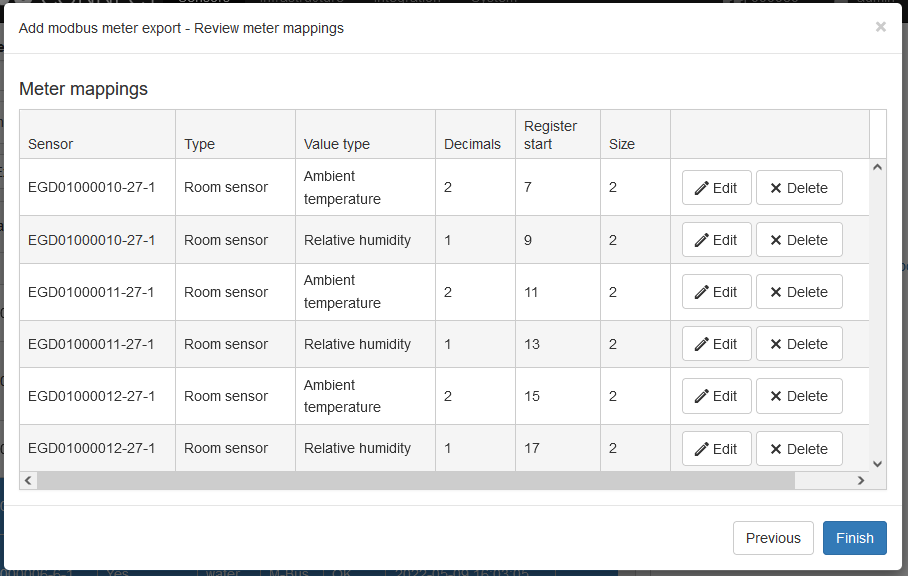
The system will generate a suggestion based on the provided information. Mappings can be edited or deleted. When finished, click Finish.
Once the Modbus export integration is created and visible under Integrations in MIVO Connect, you can access it in two ways:
- Via the MIVO unit’s IP address: We recommend setting a static IP address to prevent issues where, for example, a BMS/DUC loses connection if DHCP assigns a new address.
- Via the LAN port’s default address: If connecting directly through the LAN port, the integration can be accessed at
10.10.10.1.
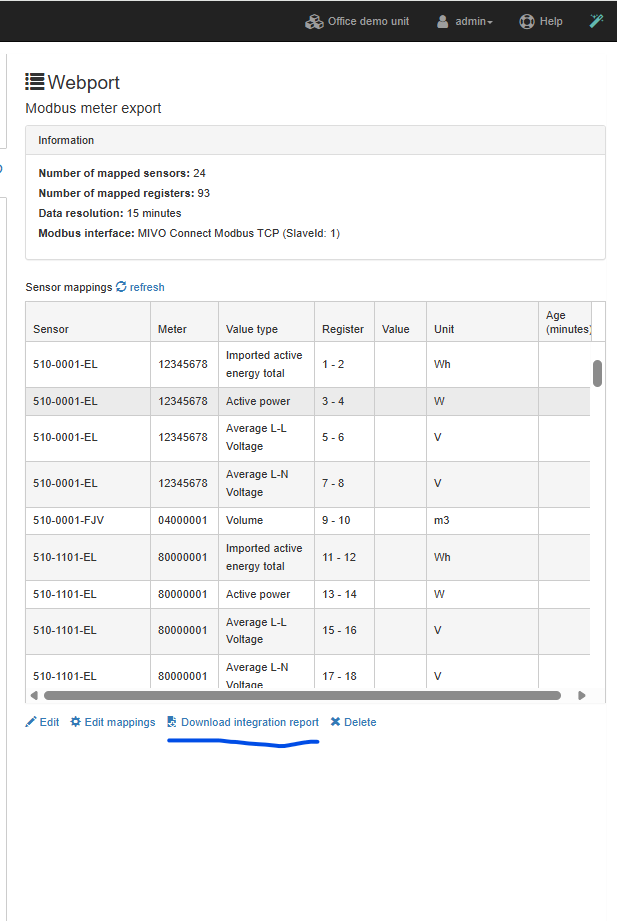
Exporting a Tag List
To export a tag list:
1. Go to the Integrations view.
2. Select the newly created Modbus integration.
3. In the Information panel, click "Download integration report".
4. Wait a few seconds, and the download will start automatically.
Note
The Value column will be automatically populated after the first interval has passed.
Note
An export can also be created directly from the Sensors view.
- Select the sensors you want to add.
- Click "Add sensors to modbus meter export" in the Information panel.
How to Export Sensors via M-Bus over IP#
-
Click the wand icon in the upper right corner of the screen to start the guide.
-
Select "Create an integration" and click Next.
-
Select "M-Bus over IP meter export" and click Next.

-
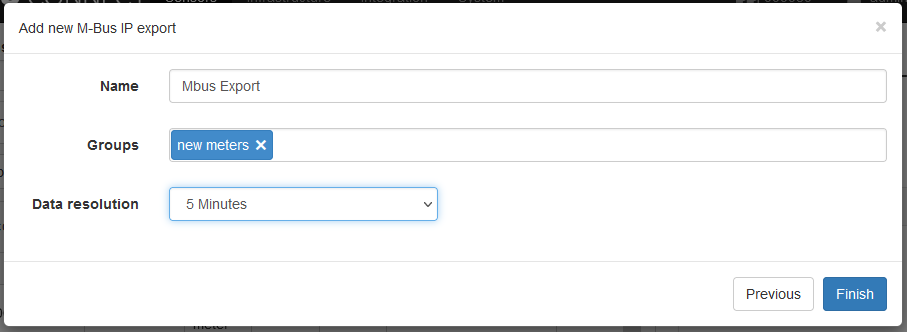
Enter a name for the integration.
- Select the groups to be exported.
-
Set an update interval and click Finish.
Note
The resulting export can be viewed, modified, and deleted in the Integrations view.
PRACTICAL FUNCTION – M-BUS OVER IP EXPORT
- MIVO first collects all measurement values from the meters (via wired M-Bus, wireless M-Bus, Modbus, etc.) as usual.
- When the export is enabled, MIVO opens a TCP port (often port 10001 or similar) where an external system (e.g., billing system, SCADA, energy management system) can connect as an M-Bus master.
- The external system can then “query” MIVO for meter data as if MIVO were a physical M-Bus bus.
- MIVO responds with data from its internal registers, meaning the external system does not need to communicate directly with each meter – only with MIVO.
Creating a Periodic Value Export#
Sending Measurement Data from MIVO Connect to a Cloud Service
In some cases, there is a need to forward measurement data from MIVO Connect to an external system for processing, visualization, or storage. This may include:
- Presenting data in a custom-developed platform
- Integrating with business, property, or energy systems not included in MIVO’s standard integrations
- Staging or analyzing data in your own data warehouse or cloud service
To support this, MIVO Connect offers a flexible feature for periodic export of measurement data via HTTP/HTTPS in JSON format. This allows you to automatically send selected measurement values to a specified URL.
This guide walks you through how to configure a Periodic Value Export step by step.
Step 1: Start the Export Wizard
- Click the magic wand (top-right in the web interface)
- Select Create an integration
- Choose Periodic Value Export and click Next
Step 2: Configure the Integration
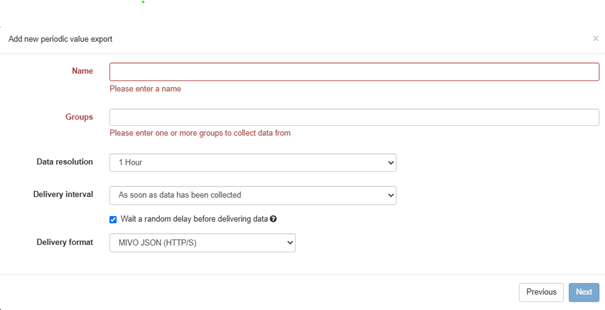
In the next view, fill in the following:
- Name: Provide a clear name for the integration, e.g.
Export to Cloud Service - Group: Select the group containing the sensors/meters you want to export data from
- Data resolution: Choose the desired resolution (e.g. hourly, daily values)
- Data interval: Set how often the data should be sent (e.g. every hour, daily)
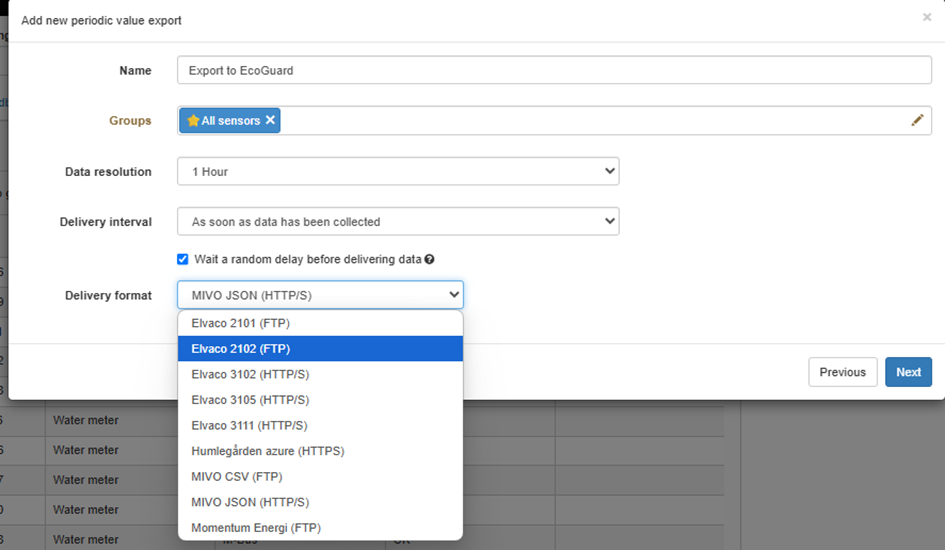
- Format: Select the export format – usually JSON via HTTPS
Tip: The dropdown menu also includes preconfigured options, such as FTP export to Momentum Energi.
Step 3: Choose Which Measurement Values to Export
Now decide which types of values you want to include in the export. Common examples include:
- Temperature
- Energy consumption
- Flow
- Voltage
- Power
Check the values that are relevant for your selected group.
Step 4: Set Destination and Connection Details
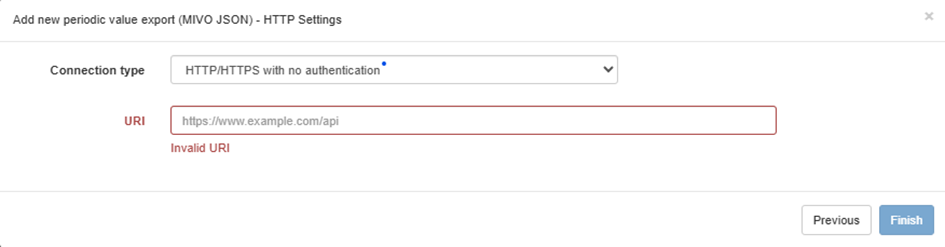
In the final step, define how and where the data should be sent:
- Connection type: For example, HTTP or HTTPS
- URL: The endpoint of your cloud service, e.g.
https://api.myserver.com/mivodata - Authentication: If your system requires authentication, you can add a Bearer Token in the header:
Authorization: Bearer <your_token>

Step 5: Save and Activate
Click Finish to complete the setup.
The export will now run automatically according to the interval you have configured.
Specific Integrations#
This section is a guide to help you configure specific integrations in MIVO Connect. All of these integrations are based on our Periodic Value Report mechanism, but they push data in different formats depending on the target system.
For each export destination, we will show: - Which format you need to select in MIVO Connect - What information you need to collect from the respective third-party system
These guides are designed to make it easier to connect MIVO Connect to external platforms and ensure that your data is transmitted accurately and reliably.
Create a Mestro Integration in MIVO Connect#
Follow the steps below to configure an integration between MIVO Connect and Mestro:
-
Log in to the MIVO Connect web interface and click on the
in the top right corner. -
Select the option "Create an integration", click Next, choose "Mestro integration", and proceed with Next.

-
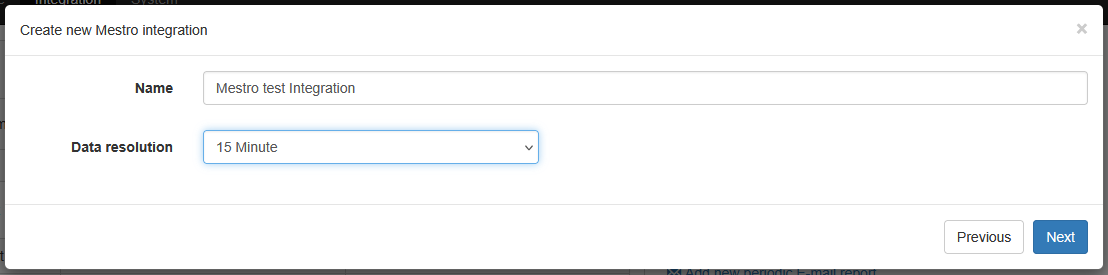
Enter a custom name for your integration and select the desired data transmission interval.
-
Choose the sensor group to be exported to Mestro and click Next.

-
Fill in your Mestro login credentials:
- Username
- Password
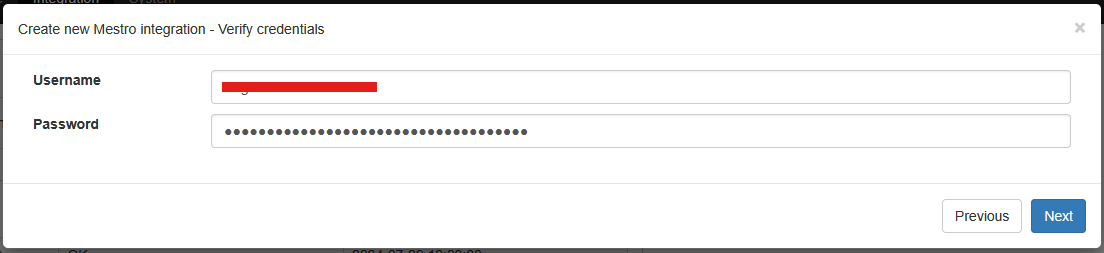
If you do not have these credentials, contact Mestro.
-
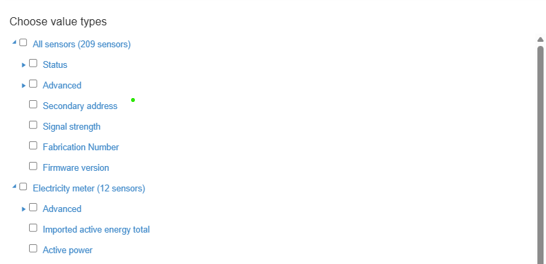
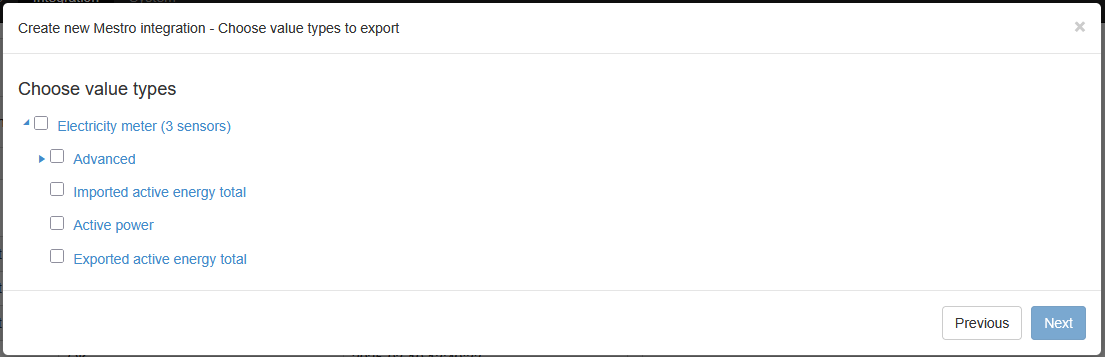
Now check the values you want to export and click Next
-
In the final step, match each sensor with the corresponding Mestro node:
- Select a sensor
- Check the associated node
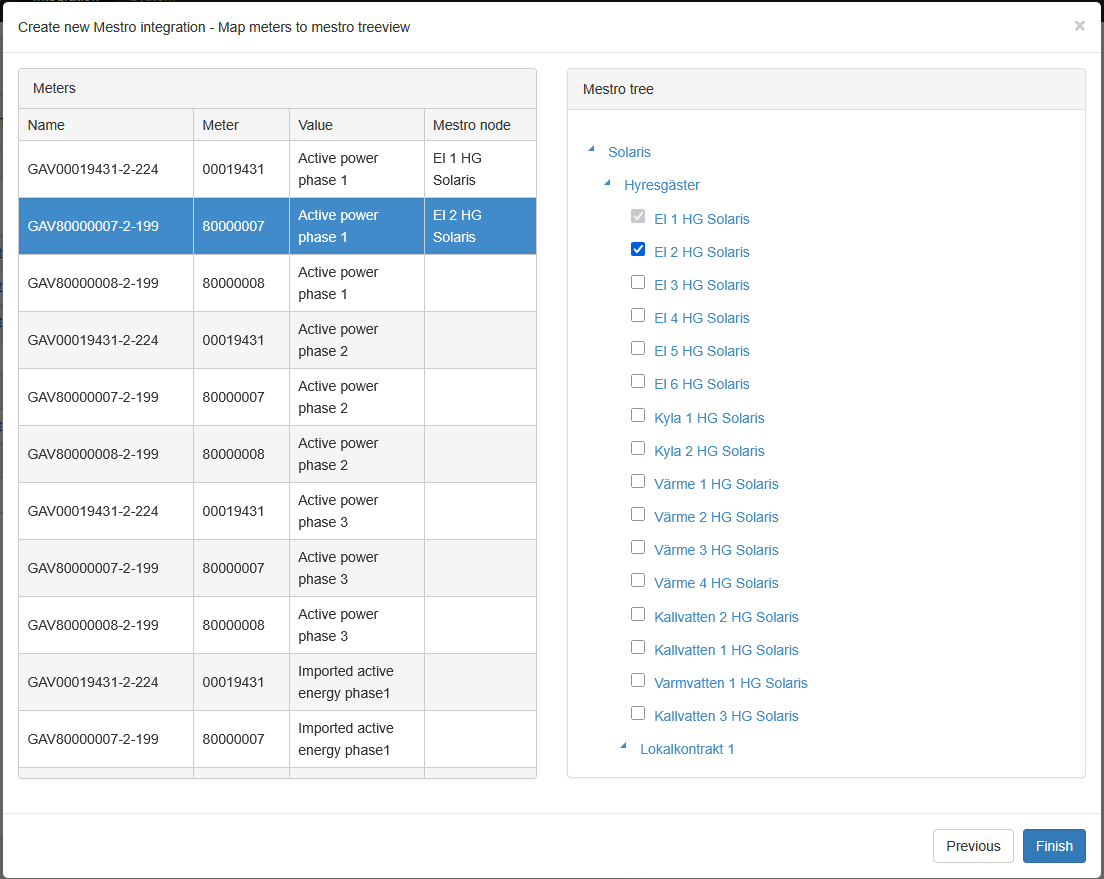
Repeat this for all sensors.
When you're done, click Finish to complete the integration.
Create a EcoGuard Curves integration in MIVO Connect#
To export data to EcoGuard Curves using the Periodic Value Report functionality in MIVO Connect, select the format Elvaco 2102 (FTP).
Then follow the integration wizard in MIVO Connect until you reach the final step of the setup.
At this point, you will need specific configuration details from EcoGuard.
If you do not have these credentials, contact EcoGuard.
Create a EL Online integration in MIVO Connect#
To export data to ElOnline using the Periodic Value Report functionality in MIVO Connect, select the format MIVO JSON.
Then follow the integration wizard in MIVO Connect until you reach the final step of the setup.
At this point, you will need specific configuration details from ElOnline.
If you do not have these credentials, contact El-Online.
Create a Göteborg Energi integration in MIVO Connect#
To export data to Göteborg Energi using the Periodic Value Report functionality in MIVO Connect, select the format Elvaco 3105.
Then follow the integration wizard in MIVO Connect until you reach the final step of the setup.
At this point, you will need specific configuration details from Göteborg Energi.
If you do not have these credentials, contact Göteborg Energi.
Create an Infometric Panorama integration in MIVO Connect#
To export data to Infometric Panorama using the Periodic Value Report functionality in MIVO Connect, select the format MIVO JSON.
Then follow the integration wizard in MIVO Connect until you reach the final step of the setup.
At this point, you will need specific configuration details from Infometric Panorama.
If you do not have these credentials, contact Infometric.
Create a Loggamera integration in MIVO Connect#
To export data to Loggamera using the Periodic Value Report functionality in MIVO Connect, select the format MIVO JSON.
Then follow the integration wizard in MIVO Connect until you reach the final step of the setup.
At this point, you will need specific configuration details from Loggamera.
If you do not have these credentials, contact Loggamera.
Create a Metry integration in MIVO Connect#
To export data to Metry using the Periodic Value Report functionality in MIVO Connect, select the format MIVO JSON.
Then follow the integration wizard in MIVO Connect until you reach the final step of the setup.
At this point, you will need specific configuration details from Metry.
If you do not have these credentials, contact Metry.
Create a Momentum Energi integration in MIVO Connect#
To export data to Momentum Energi using the Periodic Value Report functionality in MIVO Connect, select the format Momentum Energi (FTP).
Then follow the integration wizard in MIVO Connect until you reach the step where you select measurement values.
At this stage, choose the values you want to include in the export (e.g., energy, temperature, power).
You will also need to manually specify the unit for each selected value (e.g., kWh, °C, W).
Continue through the wizard until you reach the final step of the setup.
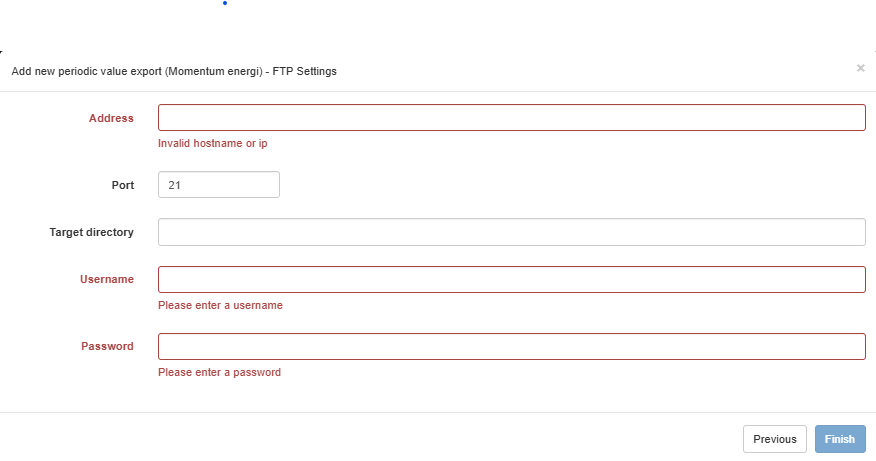
At this point, you will need specific configuration details from Momentum Energi, such as FTP server address, credentials, and folder paths.
If you do not have these credentials, contact Momentum Energi.
Create a Propeye integration in MIVO Connect#
To export data to Propeye using the Periodic Value Report functionality in MIVO Connect, select the format Elvaco 3111.
Then follow the integration wizard in MIVO Connect until you reach the final step of the setup.
At this point, you will need specific configuration details from Propeye.
If you do not have these credentials, contact Propeye.
Create a Sensor Online integration in MIVO Connect#
To export data to Sensor Online using the Periodic Value Report functionality in MIVO Connect, select the format MIVO JSON.
Then follow the integration wizard in MIVO Connect until you reach the final step of the setup.
At this point, you will need specific configuration details from Sensor Online.
If you do not have these credentials, contact Sensor Online.
Create a Webport integration in MIVO Connect#
To export data to Webport, use the Modbus Sensor Export functionality in MIVO Connect. This integration is done via Modbus TCP, which allows Webport to retrieve real-time data directly from the MIVO unit.
Step 1: Start the Export Wizard#
- Log in to the MIVO Connect web interface.
- Click the magic wand icon in the top right corner.
- Select Create an integration.
- Choose Modbus Sensor Export and click Next.
Step 2: Configure the Export#
- Name: Enter a clear name for the integration, e.g., "Webport Modbus Export".
- Data Resolution: Choose the appropriate resolution (e.g., 1-minute or 5-minute values), based on what Webport will poll.
- Communication Type: Select Modbus TCP.
Step 3: Select Groups and Values#
- Choose the group(s) of meters or sensors you want to make available to Webport.
- For each sensor or data point, specify the following:
- Unit (e.g., °C, kWh, m³)
- Scaling / Decimals (e.g., 2 decimals: 2534 = 25.34)
- Register Size (e.g., 2 or 4 bytes)
- Start Register (the Modbus address Webport will read from)
Make sure to allocate non-overlapping register ranges if multiple groups or sensors are exported.
Step 4: Assign Registers#
- MIVO will automatically suggest a register map, but you can edit it to match your Webport configuration.
- You can download a register map to share with the Webport integrator.
Step 5: Generate Tag List for Webport#
The next step is to create the tag list for the Webport integration. You can download the official template file here:
Download Tag List Template (Excel)
Once this file is downloaded, download your Modbus map from MIVO and follow the instructions in the Excel file to generate the tag list.
If you need assistance, don’t hesitate to contact MIVO Support.