Wireless M-bus converters
Adding#
MIVO Wireless M-bus Extender#
Prerequisites
Before you begin, ensure you have the following:
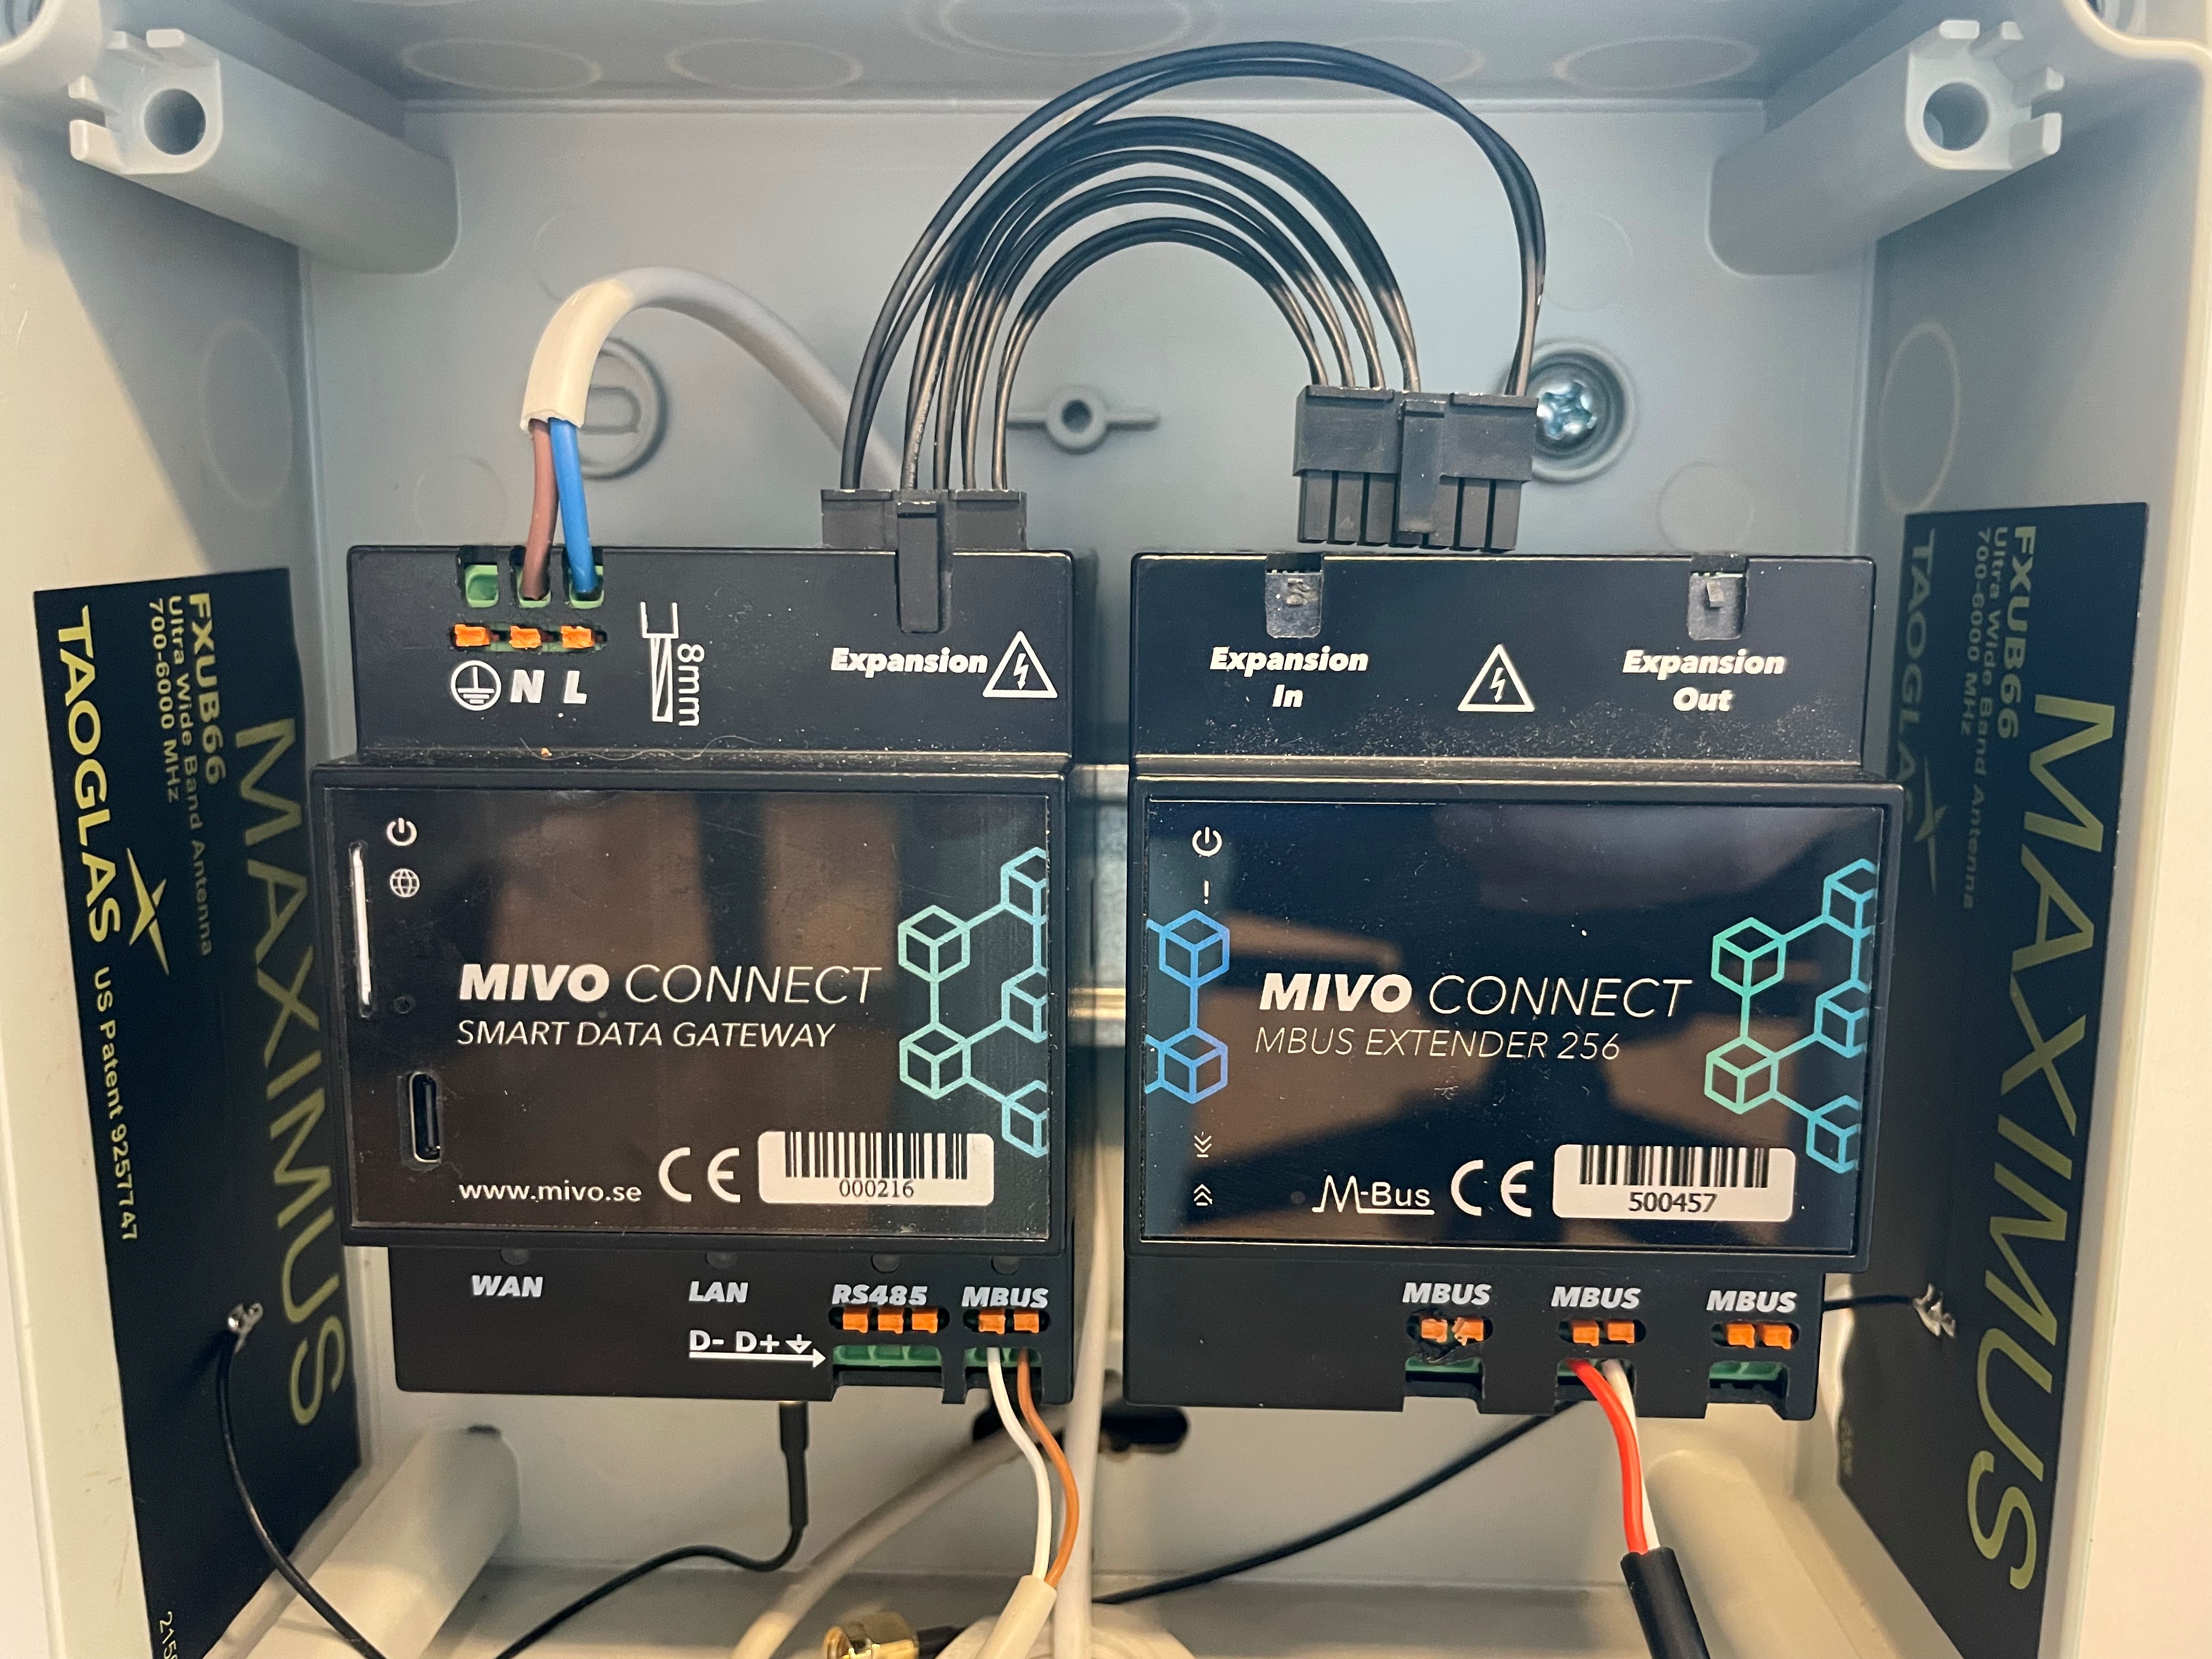
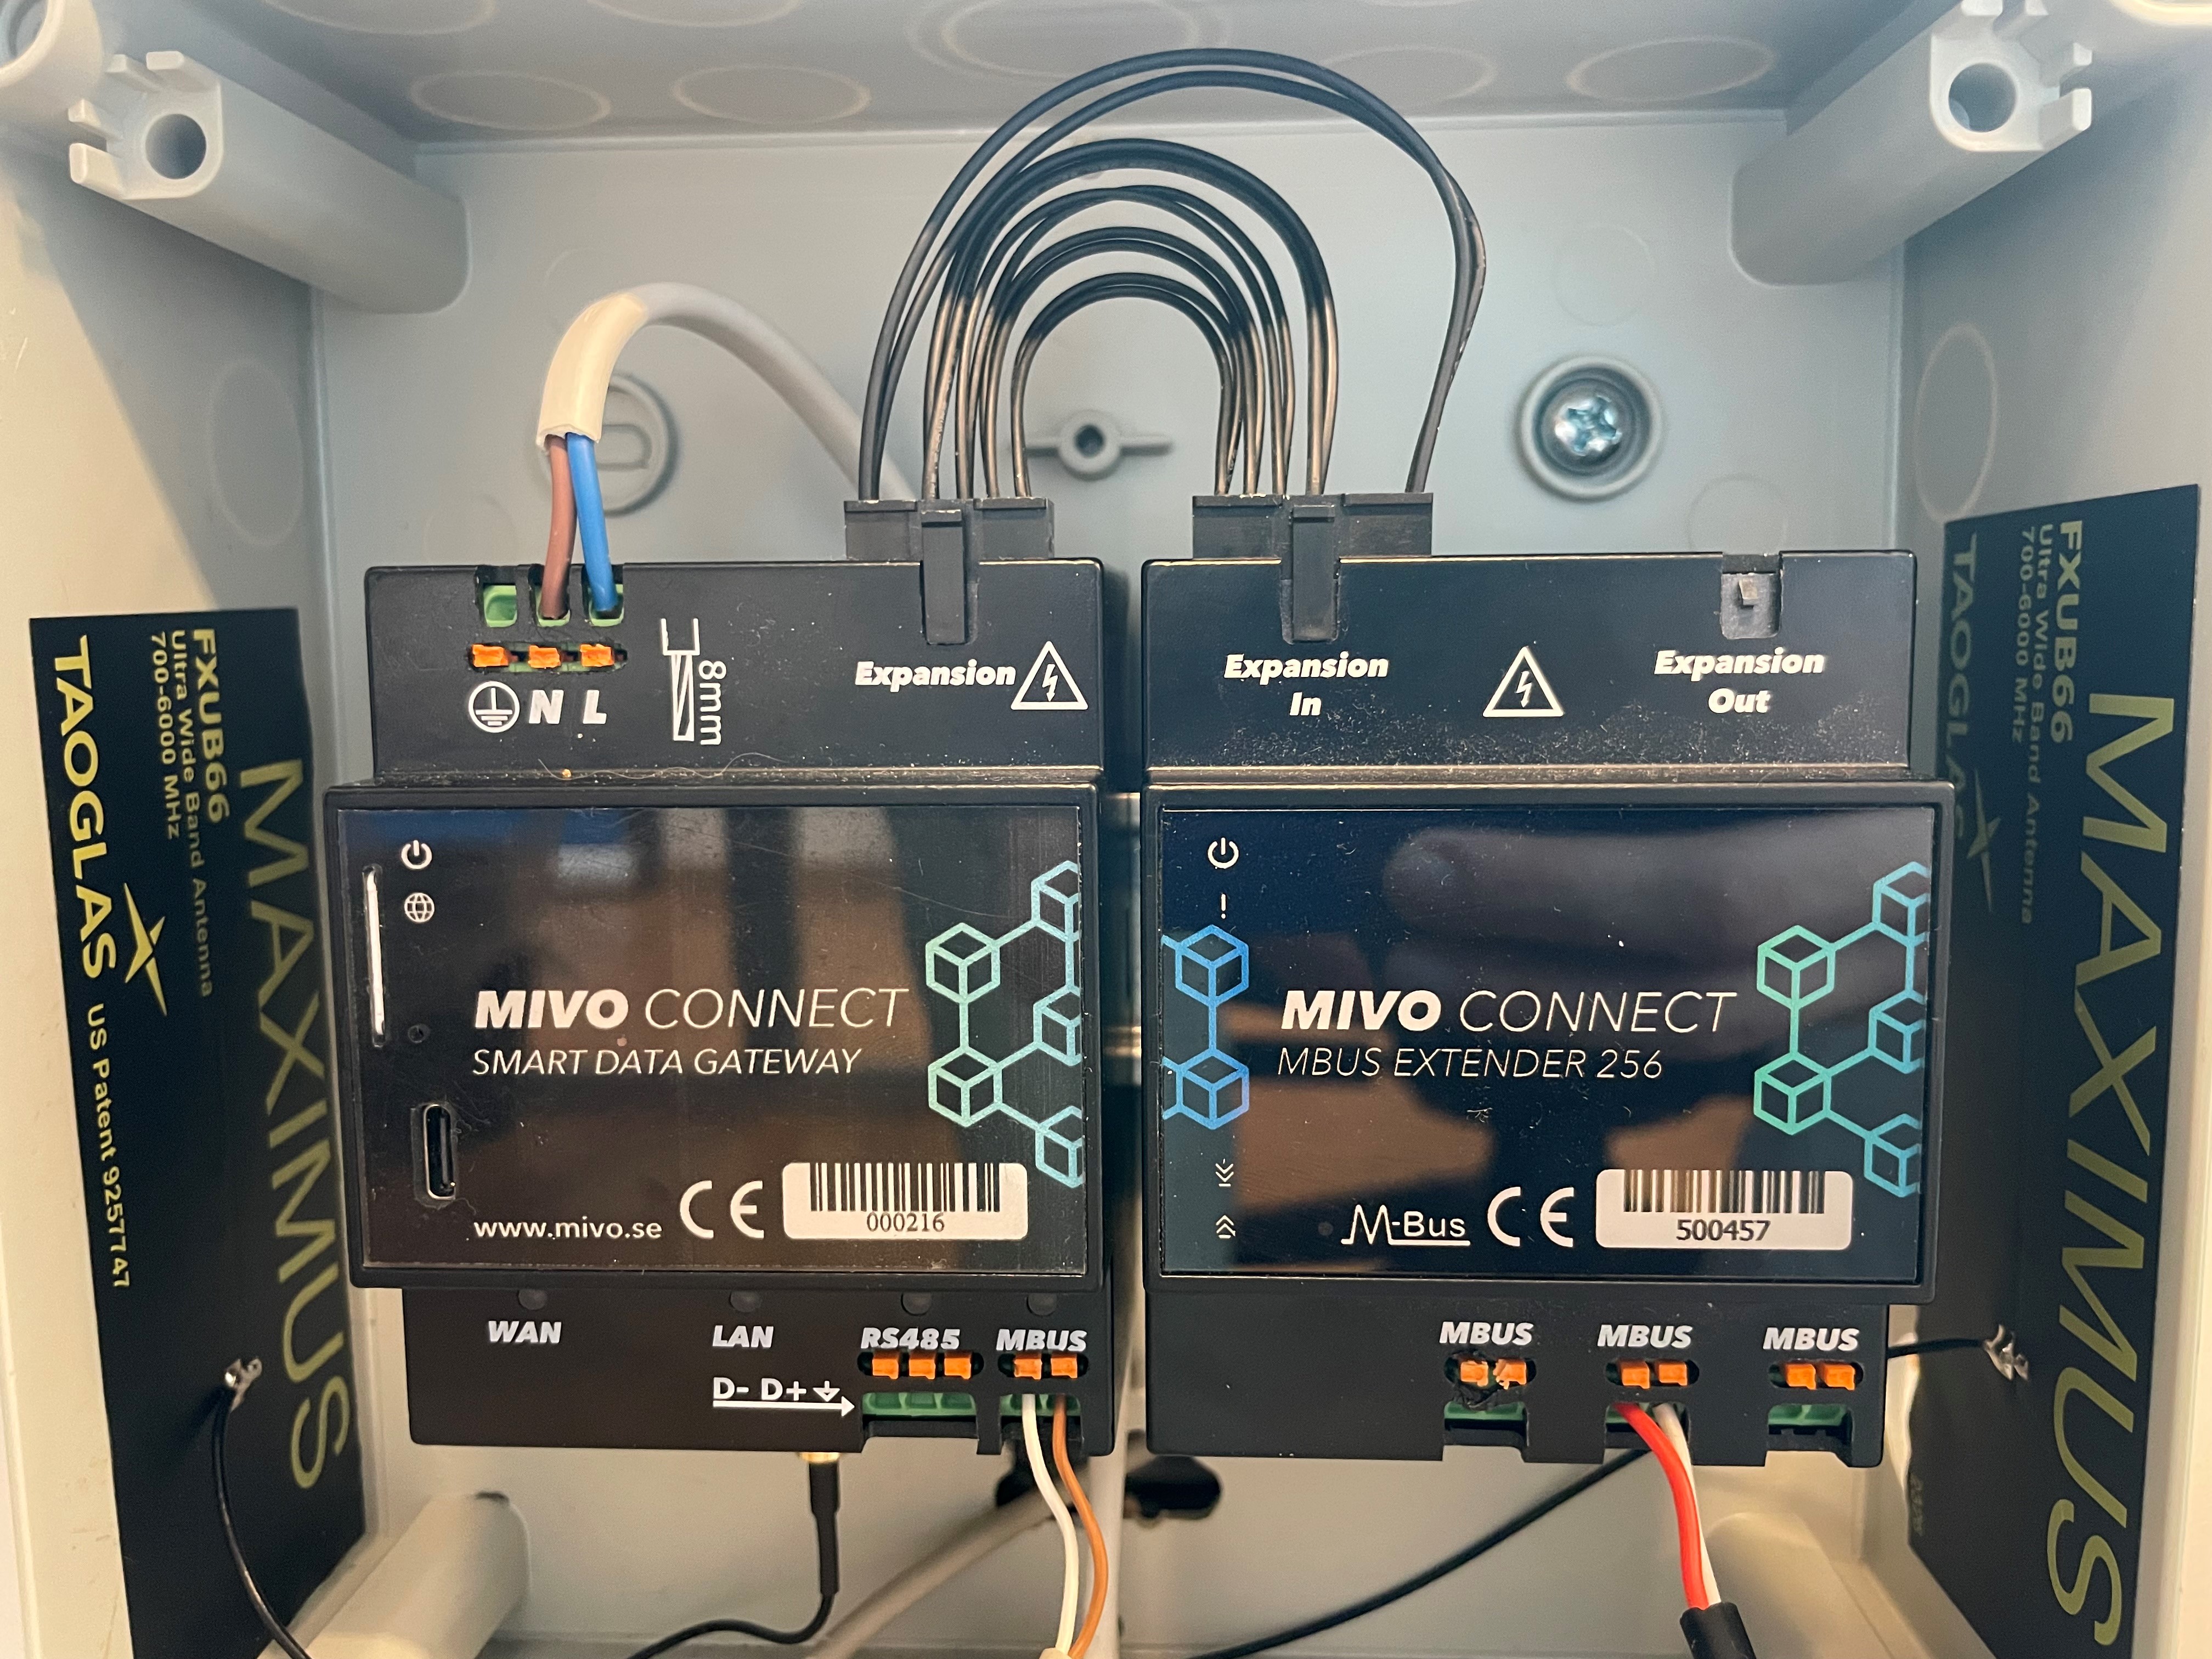
- A MIVO Connect
- The external MIVO M-Bus Extender
- Necessary cables
Important Safety Note: Ensure that the MIVO device is powered off before making any connections. This is critical to avoid damage to the devices or injury to personnel.
-
Disconnect the MIVO device from its power source.
-
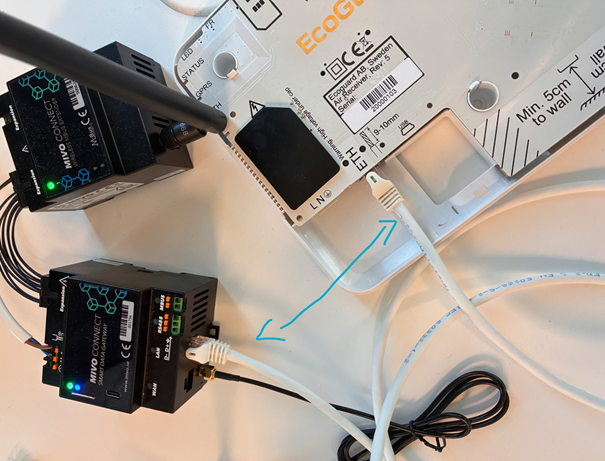
Connect the MIVO extender to the MIVO Connect. Ensure all connections are firmly in place.
-
Power On the System. The external MIVO M-Bus Extender should automatically synchronize and become operational.
Elvaco CMeX50/CMiBox Wireless Receiver#
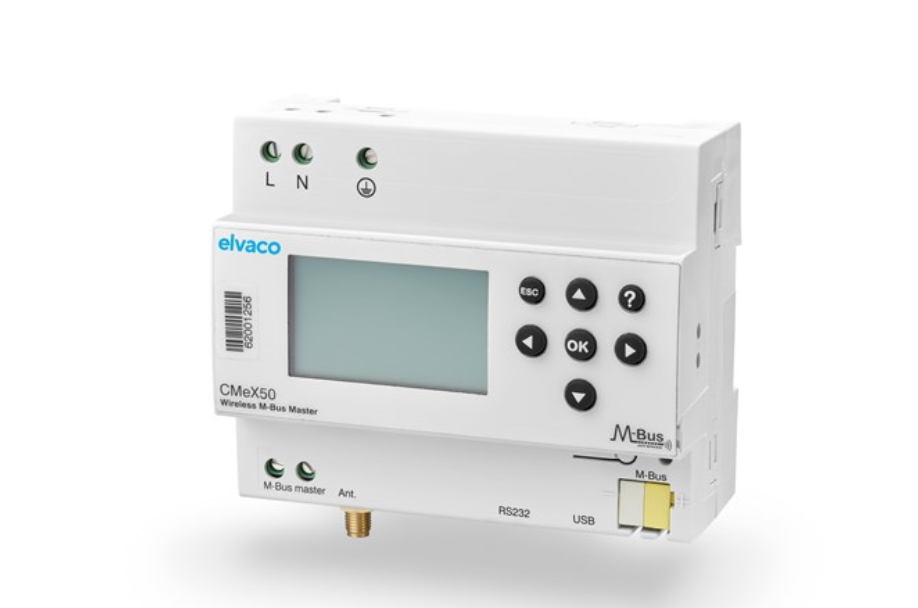
The Elvaco CMeX50 and CMiBox are connected to MIVO Connect via an M-Bus line.
When such a device is added under Infrastructure, MIVO Connect will automatically and continuously poll the receiver for new wireless telegrams from connected meters and sensors.
If you expect to handle a large number of wireless meters or sensors, it is recommended to limit the number of CMeX50/CMiBox receivers per M-Bus line.
This ensures that MIVO Connect can reliably collect all meters without overloading the M-Bus communication.
In this guide, we’ll go through how to:
- add a CMeX50 or CMiBox under Infrastructure
- verify that communication is working correctly
- import the wireless meters detected by the receiver
In the background, MIVO listens for incoming wireless telegrams from the Elvaco system – in the same way it does with, for example, the EcoGuard AirReceiver.
Step 1 – Connect the Elvaco Receiver to MIVO Connect
For MIVO to receive data from the Elvaco device, you must first connect it to the infrastructure in MIVO.
Here's how:
- Ensure the Elvaco receiver (e.g. CMeX50) is connected to the same network as MIVO Connect, or that MIVO has access to the device via its IP address.
- Log in to the MIVO Connect web interface and open the Infrastructure view.
- Click the magic wand (top-right corner).
- Select the option "Elvaco CMeX50/CMiBox wireless receivers" and click Next.
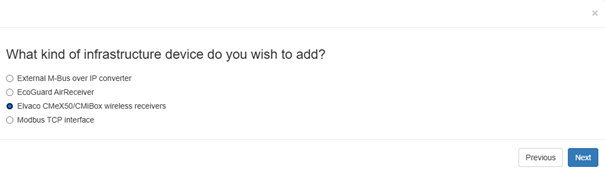
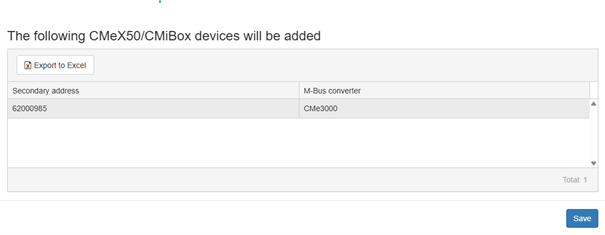
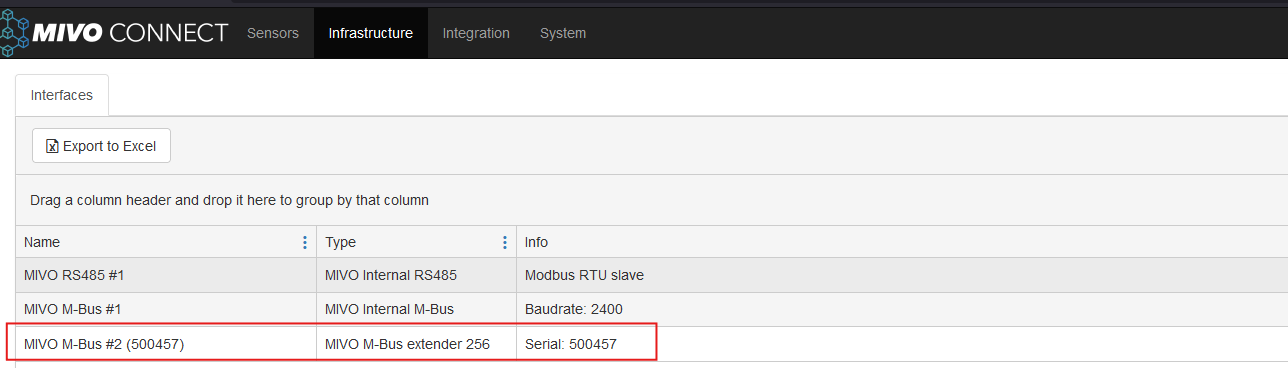
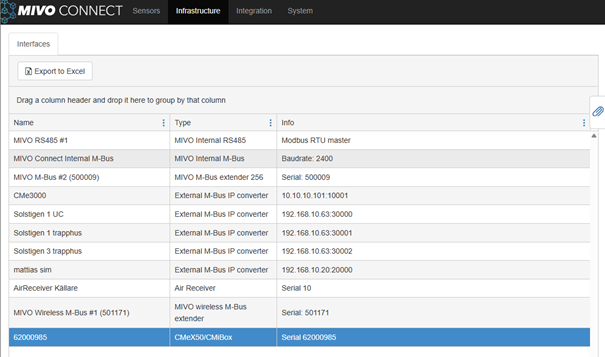
When the device is successfully connected, it will appear in the next step. You can save it, and it will be shown in the Infrastructure view using its serial number by default.
You can easily rename it later if you wish.
Step 2 – Add Meters Received via Elvaco
Once the infrastructure is created and active, you can begin adding the meters from which the Elvaco receiver collects data.
Follow these steps:
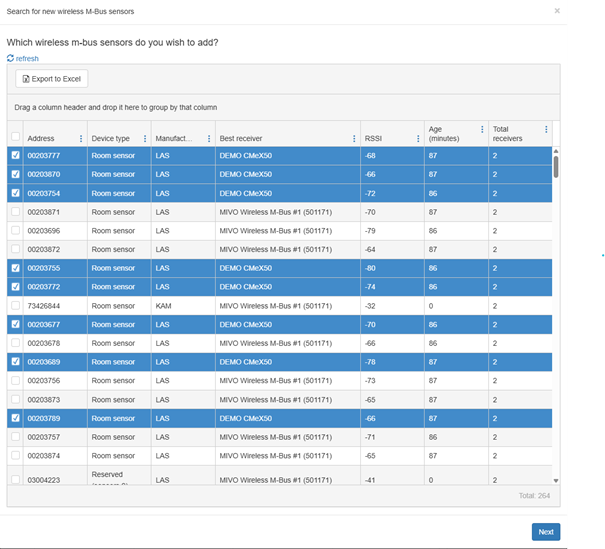
- Go to the Sensors tab in MIVO Connect.
-
Click the magic wand and select "Search for wireless M-Bus sensors".
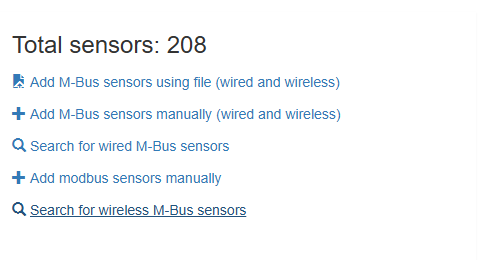
-
Meters detected by Elvaco will now be listed.
-
Select the meters you want to add to your MIVO device and complete the import.
After that, you can begin working with these meters as usual in MIVO – creating integrations, monitoring, reports, and more.
ECOGUARD - Air Receiver#
This guide is for those who want to collect measurement data from EcoGuard's wireless sensors into MIVO Connect. Since EcoGuard's sensors use a proprietary protocol, an EcoGuard AirReceiver is required as an intermediary. It acts as a bridge between EcoGuard’s sensors and MIVO Connect, enabling the data to be imported and managed in a standardized way through MIVO’s interface.
In this guide, we’ll walk you step-by-step through how to add the AirReceiver in MIVO Connect’s web interface under the "Infrastructure" tab, and show how to ensure communication from the sensors to MIVO works properly.
Before we begin the guide, make sure you have a console/terminal program installed on your computer. Recommended programs are TeraTerm or PuTTY.
-
Connect the AirReceiver to the LAN port on MIVO Connect
Then connect a USB from the EcoGuard AirReceiver to your computer.
-
Once you've connected your EcoGuard AirReceiver via USB to your computer, you need to find out which COM port it was assigned.
-
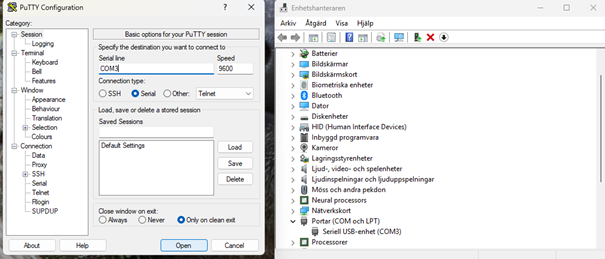
Open Device Manager in Windows.
-
Under the category Ports (COM & LPT), you’ll find an entry like "USB Serial Device (COM3)" – this is the port you should use. Take note of the number, in this case COM3.
-
Open a terminal program, such as PuTTY, and select Serial as the "Connection type".
-
Enter the correct port (e.g., COM3) in the Serial line field and set speed to 9600.
-
Click Open to connect.
Note
The COM port is also referred to as a serial port and is used for communication between the computer and external devices, in this case, the AirReceiver. You’ll find it under “Ports (COM & LPT)” in Device Manager.
-
-
Once you’ve opened the terminal window as described above (e.g., via PuTTY), you’ll need to log in to the AirReceiver’s interface.
-
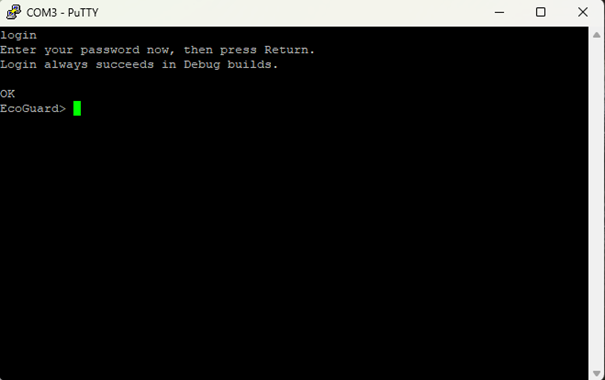
Start by typing the command: login
-
Press Enter.
-
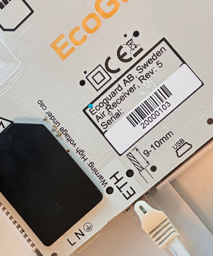
The terminal will then ask you for a password – enter the AirReceiver’s serial number here, e.g., 20000103, and press Enter again.
You’ll find the serial number on the label on the AirReceiver.
If the login is successful, you’ll see the message OK followed by the prompt: This means you’re now logged in and ready to start configuring the device. (See image below)
-
-
Enter configuration commands in the terminal
Once logged into the AirReceiver’s terminal via PuTTY, it’s time to enter the following commands one by one:
set_gsm_mode 0set_ethernet_mode 2set_time_synchronization_mode 2set_sensor_data_gateway_service_max_interval 0set_sensor_data_gateway_service_min_data_relay_interval 0set_sensor_data_gateway_service_server_address 10.10.10.1set_sensor_data_gateway_service_server_port 50057save_settingsYou can write all commands using abbreviations, where only the first letter of each word is used. For example, set_gsm_mode 0 can also be written as Sgm 0, and set_sensor_data_gateway_service_server_address can be abbreviated to Ssdssa.
Last but not least, run the command below to restart the device and activate all settings:
reboot -
Start the infrastructure in MIVO’s interface
Now the configuration of the AirReceiver is complete, and you’re ready to add it to MIVO Connect’s infrastructure.
-
Log in to MIVO Connect:
Log in with username and password: admin / admin (unless otherwise specified).
-
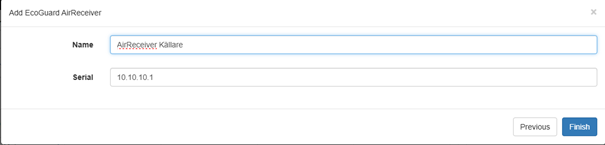
Add the AirReceiver:
Click the magic wand icon in the top right corner. Select "Add an infrastructure device" and click Next. Choose the option "EcoGuard AirReceiver" and click Next.

-
Fill in the information: - Name: Give the device a name, e.g., AirReceiver Basement. - IP address: Enter the IP address you configured in the terminal (e.g., 10.10.10.1).
-
Click "Finish" to save the device. You will now see it listed among the infrastructure devices.
-
Now the AirReceiver is connected to MIVO Connect and ready to begin receiving data from EcoGuard’s wireless sensors.
Changing settings#
Changing transmission mode#
MIVO M-bus Extender
-
Log in to your MIVO system interface and navigate to the Infrastructure View.
-
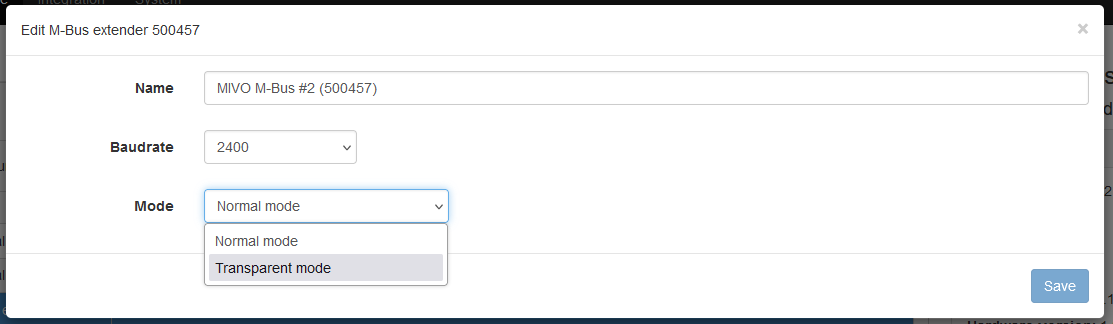
Locate the extender you wish to configure from the list of devices in the infrastructure view and click on its name to select it.
-
After selecting the extender, you will be taken to a detailed view of its configuration and status. At the bottom of the extender's view, press the Edit button to enable configuration changes.
-
Locate the field labeled Mode. You will see two available options:
- Normal Mode
- Transparent Mode
Select the mode you wish to switch to by clicking the corresponding option.
-
Once you have selected the desired mode, press the Save button to confirm your changes. Wait for the system to apply the new settings.
Note
- Normal Mode: This is the default operating mode for standard functionality.
- Transparent Mode:
CMeX50
EcoGuard AirReciver